Hi, I have been carrying out Guitar setups and repairs for over 30 years it is a passion of mine to make each setup tailored to suit your style of playing and make you and your guitar sing.
From beginners to professionals, I have been there to help them on their guitar-playing journey, whether it's a new setup, repairs, upgrades, or any other problem they encounter. Usually, I can find a solution to the problem.
So, you can be certain, I am here to help you with your guitar playing.
I will also provide you with tips and help you look after your instrument every day.
I aslo stock a wide range of strings and accessories From Earnie Ball, Fender and many more for retail sale.
What is a Setup?
A Setup is the adjustment of an instrument to provide the best playing instrument for the player. Almost every guitar has a wide array of things that can be adjusted to suit the player’s taste: action all over the fingerboard, neck relief, bridge height and radius, intonation, nut height, pickup height, etc. Every adjustment should be to the tightest of tolerances possible, often down to less than .001mm.
Why do you need a professional Setup?
Even if your instrument is brand new, straight out of the factory or off the showroom floor, no matter how expensive it is, the chances are that its setup is far from perfect. Let’s face it: guitar manufacturers are not in the business of handcrafting individual works of art – they are in the business of making as many guitars as they can in the shortest amount of time possible. It’s simply not in their best financial interests to make the perfect guitar – they cannot afford to in the mass production market of today. Making your guitar as perfect as possible is my number 1 priority at Elsdon Guitar Tech, and providing a perfect Setup is a huge part of what I do. I’ve invested countless hours improving my craft and spent thousands of pounds on the most up-to-date tools and technology to guarantee accurate, consistent results. No matter what your playing style is, or how long you’ve been playing, or what kind of guitar you play, your instrument will feel better, play more in tune, and even sound better.
I take a very thorough, methodical approach to a Setup at Elsdon Guitar Tech: First of all, it’s important to understand how each part of the setup influences the other parts – I don’t just start making adjustments at random. I do everything in a particular order – I don’t skip steps, and no shortcuts are taken. When a guitar is brought into my shop, I first assess the instrument and talk with the player about their individual needs. I don’t just set up a guitar to play the way I think it should play; I set it up to the way you play.
How do I carry out a setup?
Pre-Setup actions:
1) I begin by taking careful measurements on the guitar and notating these on a Setup Checklist, which I will give you with the completed guitar. I want you to know that you’re getting personalized, measurable results. The initial measurements I take – Action: Measured in millimetres at the 12th fret while fretted at the 1st fret, on both the bass side and treble side.
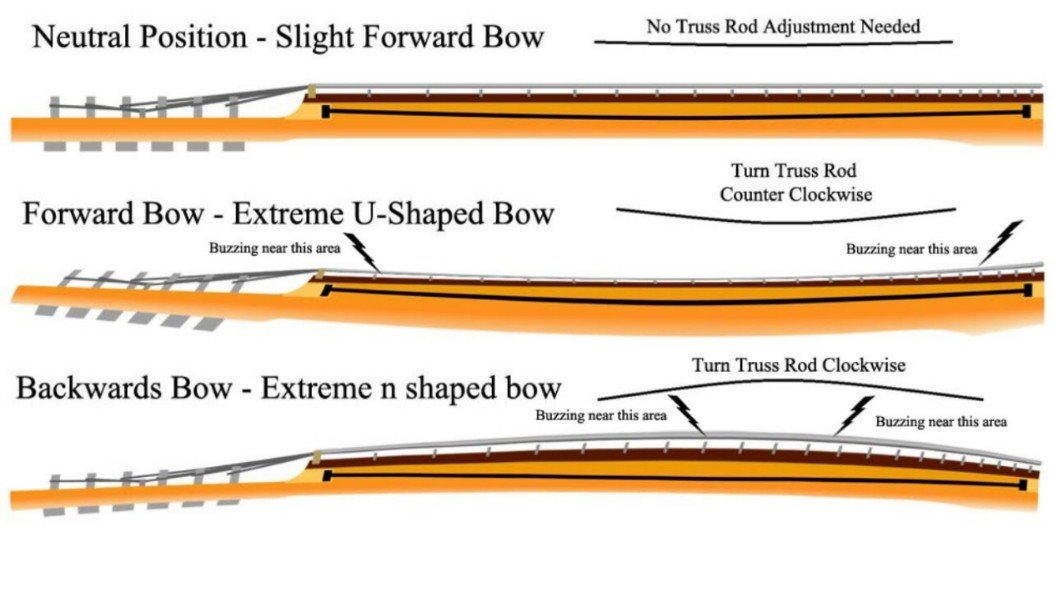
Relief: The amount of space between the bottom of the lowest string and the top of the 6th fret, while fretted at the 1st and 13th fret, measured in millimetres. (See Diagram below)
Bridge Radius: The arch of the strings at the bridge, measured with a radius gauge in inches.
String Gauge: The size of the strings, measured in thousandths of an inch.
2) I check all the electrics for any issues using a Multimeter
3) I then remove the old strings, polish the frets, and clean and oil the fingerboard.
4) I check and tighten all hardware and oil the machine heads when necessary.
5) With the strings off, I measure the fretboard radius. What’s a radius? A radius is the measurement from the centre point of a circle to its edge. A guitar’s fretboard is almost never flat – it’s curved. The curve of the board is essentially just a segment of a larger circle, usually with a radius of 7.25″-20″. I measure it at this stage and notate the results for reference later in the Setup when I’m setting the action at the bridge.
6) I do check for any uneven frets as this will obviously affect playability; these may need to be re-seated, or levelled, crowned and polished, and the owner informed, as this incurs further costs. Or the action would need to be higher, which defeats the object of a good setup. I do not recommend this course of action
7) Lower the pickups to ensure proper intonation. A pickup’s magnetic field can interfere with the string’s oscillation, so I lower them at this stage to get accurate results when setting the intonation later.
8) Now I restring the instrument and notate the gauge (thickness) of the strings on the Setup Checklist.
The Setup
1) Set the strings to Standard Pitch (unless the player has requested a different tuning), which creates the correct tension of the instrument for the setup.
2) Neck relief: with a capo on the first Fret (over the actual fret wire) I then depress the 12th fret, this creates a “straight edge” between the fretboard and the straight edge of the string I then measure the neck relief at the 6th fret, this measurement will then allow me to identify any adjustment of the truss rod relief if required.
1) Tremolo Setup. If applicable, decide on whether you want a flat to body or floating, and a range in between. The majority of players don’t want to pull up on the tremolo, but they do want to “Dive” with it. So, setting the plate flat with the body, but enabling the dive function, is the best general setting.
2) I tune the guitar and then adjust the two claw screws to get the base plate flat with the body.
3) If, after adjustment, the plate is still not flat to the body, I may have to loosen the 6 pivot screws into the body in front of the saddle. Note that there will be a small space between the screws and the body; this is normal in the setup. Now I check that the plate does not raise when bending the strings; if it does, I re-adjust further.
4) Re-tune the guitar; this step is now complete.
3) String action height: on electric guitars this is done in one of two ways, if the instrument has individual saddles e.g. Stratocaster style, with the capo set over the first fret wire then at the twelfth I set the Low E and High E strings accordingly, and then adjust the individual saddles to match the radius of the fretboard.
Tune-o-matic, style. Firstly, I check that the radius is correctly matching the fretboard radius. Sometimes this could require some of the saddle slots being filed to lower the strings to match the radius. Once this is achieved, I then raise or lower the saddle posts to achieve the correct action height. This completes the required action height dependent on the player’s style.
On an Acoustic/Classical guitar, this entails checking the saddle radius, raising the action height by inserting a shim under the saddle, or lowering the action by sanding off the bottom of the saddle, or in some instances replacing the saddle, and in extreme cases replacing the entire bridge.
4) Nut Slots: Now I check the string height at the first fret to ascertain the correct depth of the Low E and A; typically, these should be around 0.50mm, D and G typically theses should be around 0.45mm B and high E typically should be 0.40mm on a guitar, (measurements on a Bass guitar differ based on a 4 string or 5 string).
Note of caution here: if the slots are already cut too low, and there is no buzz on the open strings, then it is still within tolerance levels. However, if they are too low and the open strings are buzzing, then there are two options: 1) the best option is to replace the nut. 2) For a quick fix, you can fill the slots using baking powder and CA glue (superglue). And then file the slots accordingly. I recommend replacing the nut; again, the owner must be consulted due to further costs incurred.
5) Check the playability all over the fretboard and adjust as required. I do try to play the guitar the way the customer completed the answers to my questions when they dropped it off, and I then make adjustments if necessary.
6) Intonation: Set intonation at the bridge. Intonation is a complicated subject, but the basics are that a guitar with parallel frets is never perfectly in tune all the way up and down the neck. The trick is to equalize the tuning offsets all the way across the board, so that the guitar will be mostly in tune with itself in all positions. I use a strobe tuner, which is the most accurate tuner, and check the intonation against the open string both at the 12th fret and the 19th. This is a prolonged process and is easily the most time-consuming part of the setup.13
7) Pick up height adjustment: Once the intonation is spot on, I raise the pickups back up to the proper distance from the strings. Set too close and the magnetic pull will affect how the strings oscillate, which can cause poor intonation and buzzing; set too low, the tone will be thin and weak. I set the pickups at an optimal height and equalize the outputs, making sure that none of the pickups is stronger or weaker than the others.
8) I clean & polish the instrument’s finish. I use lint-free micro-fibre cloths and high-quality polish, which won’t build up on a guitar’s finish.
Once the setup is complete, I take final measurements on the guitar and write them on the Setup Checklist, which is given to the player.
I know that everybody plays differently, and every player has different expectations from their instrument, so I encourage my customers to take their instrument home and play it for a few weeks, and then bring it back if it needs any adjustments. It’s very important to me that your instrument plays the way you want it to play, and I back all of my work with a 100% 90-day satisfaction guarantee. If you’re not completely satisfied with your setup, I will work with you until it’s perfect for your playing style.
Please feel free to call me anytime – I’ll be happy to take a look at your instrument and show you how it can be made even better.
Phone: + 4407365109796
Email: elsdonguitartech@gmail.com
5 Elsdon Road, Burton Manor, Stafford. ST17 9PY
Elsdon Guitar Tech Limited, Company Registration Number: 165050205, registered in England and Wales. Registered Office Address: 5 Elsdon Road, Burton Manor, Stafford, ST17 9PY.